Ở bài viết trước, Rán đã chia sẻ với mọi người cách cấu hình Mail Relay trên Mail Server Zimbra, nếu ai chưa xem qua có thể xem lại bài viết tại đây. Ở bài viết này, Rán sẽ chia sẻ cách để cấu hình Mail Relay trên Mail Server thông dụng (ví dụ điển hình như Postfix, Cpanel, Exchange Server,…)
Mail Relay là gì? cách tạo tài khoản mail relay miễn phí
Để trả lời câu hỏi này, nếu các bạn chưa đọc bài viết Rán nói về nội dung của Mail Relay thì các bạn vui lòng tham khảo lại bài viết trước Rán đã viết tại đây..
Cấu hình mail relay trên Cpanel
Để cấu hình mail relay, mọi người cần phải có tài khoản Mail Relay và ở đây Rán chọn SMTP2GO để đăng ký và sử dụng. Mọi người có thể đọc lại bài viết này để đăng ký miễn phí tài khoản SMTP2GO sử dụng miễn phí 1000 email mỗi tháng và giới hạn 5 domain cho mỗi tài khoản được tạo thành công.
Quay lại chủ đề chính về vấn đề cấu hình Mail Relay trên Cpanel, mọi người thực hiện như sau:
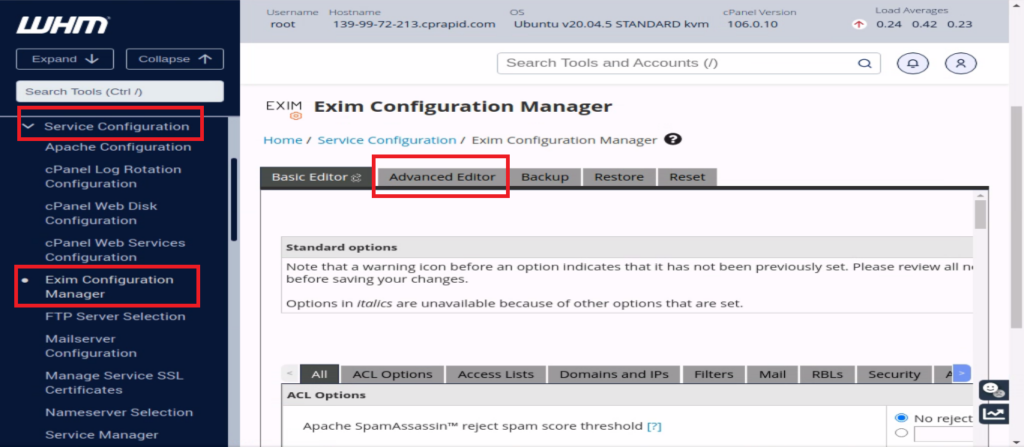
Đầu tiên, mọi người truy cập vào WHM với Port 2087, tìm kiếm Service Configurations => Exim Configuration Manage (hoặc cũng có thể search Exim Configuration Manage từ thanh tìm kiếm) và chọn mục “Advanced Editor”.

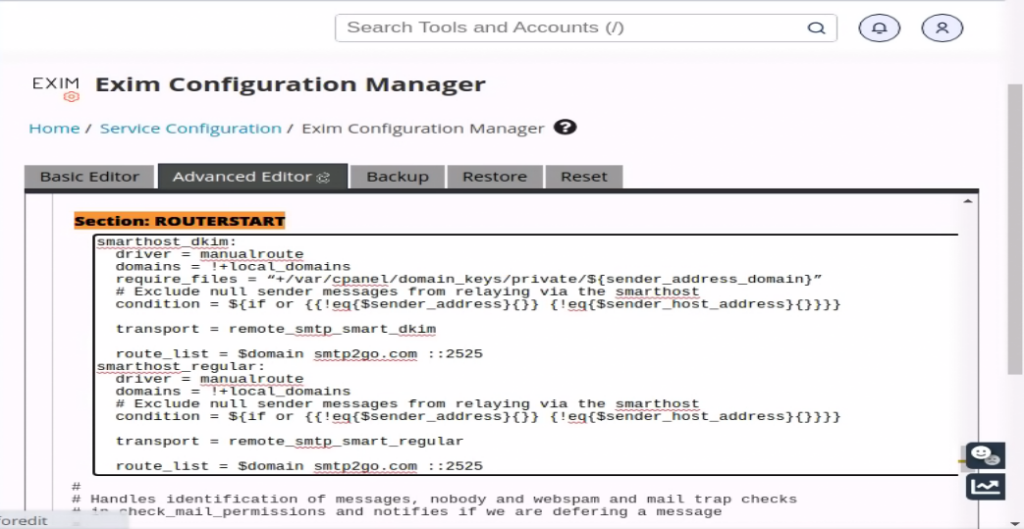
1). Tìm đến “Section: ROUTERSTART” thêm vào nội dung như sau:
smarthost_dkim:
  driver = manualroute
  domains = !+local_domains
  require_files = “+/var/cpanel/domain_keys/private/${sender_address_domain}”
  # Exclude null sender messages from relaying via the smarthost
  condition = ${if or {{!eq{$sender_address}{}} {!eq{$sender_host_address}{}}}}

  transport = remote_smtp_smart_dkim

  route_list = $domain smtp2go.com ::2525
smarthost_regular:
  driver = manualroute
  domains = !+local_domains
  # Exclude null sender messages from relaying via the smarthost
  condition = ${if or {{!eq{$sender_address}{}} {!eq{$sender_host_address}{}}}}

  transport = remote_smtp_smart_regular

  route_list = $domain smtp2go.com ::2525

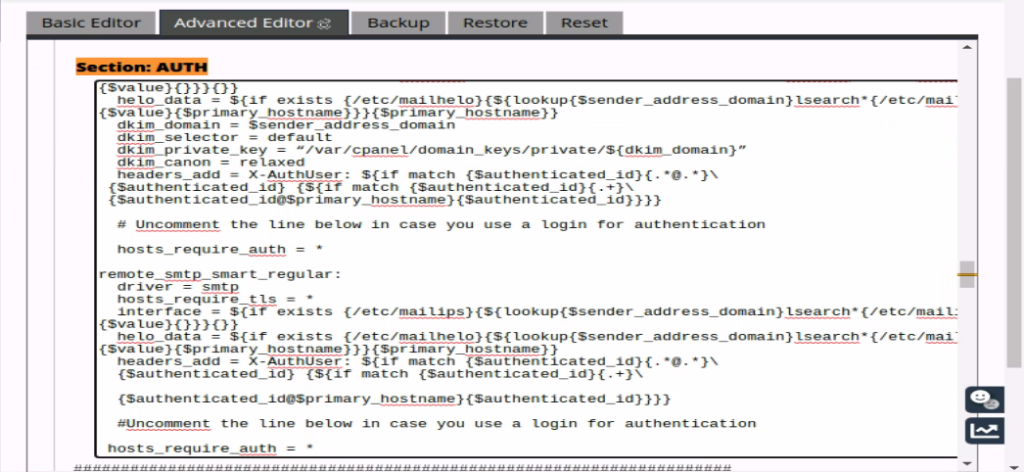
2). Tìm đến “Section: AUTH”thêm vào nội dung như sau:
remote_smtp_smart_dkim:
  driver = smtp
  hosts_require_tls = *
  interface = ${if exists {/etc/mailips}{${lookup{$sender_address_domain}lsearch*{/etc/mailips}{$value}{}}}{}}
  helo_data = ${if exists {/etc/mailhelo}{${lookup{$sender_address_domain}lsearch*{/etc/mailhelo}{$value}{$primary_hostname}}}{$primary_hostname}}
  dkim_domain = $sender_address_domain
  dkim_selector = default
  dkim_private_key = “/var/cpanel/domain_keys/private/${dkim_domain}”
  dkim_canon = relaxed
  headers_add = X-AuthUser: ${if match {$authenticated_id}{.*@.*}\
 {$authenticated_id} {${if match {$authenticated_id}{.+}\
 {$authenticated_id@$primary_hostname}{$authenticated_id}}}}

  # Uncomment the line below in case you use a login for authentication

  hosts_require_auth = *

remote_smtp_smart_regular:
  driver = smtp
  hosts_require_tls = *
  interface = ${if exists {/etc/mailips}{${lookup{$sender_address_domain}lsearch*{/etc/mailips}{$value}{}}}{}}
  helo_data = ${if exists {/etc/mailhelo}{${lookup{$sender_address_domain}lsearch*{/etc/mailhelo}{$value}{$primary_hostname}}}{$primary_hostname}}
  headers_add = X-AuthUser: ${if match {$authenticated_id}{.*@.*}\
  {$authenticated_id} {${if match {$authenticated_id}{.+}\

  {$authenticated_id@$primary_hostname}{$authenticated_id}}}}

  #Uncomment the line below in case you use a login for authentication

 hosts_require_auth = *

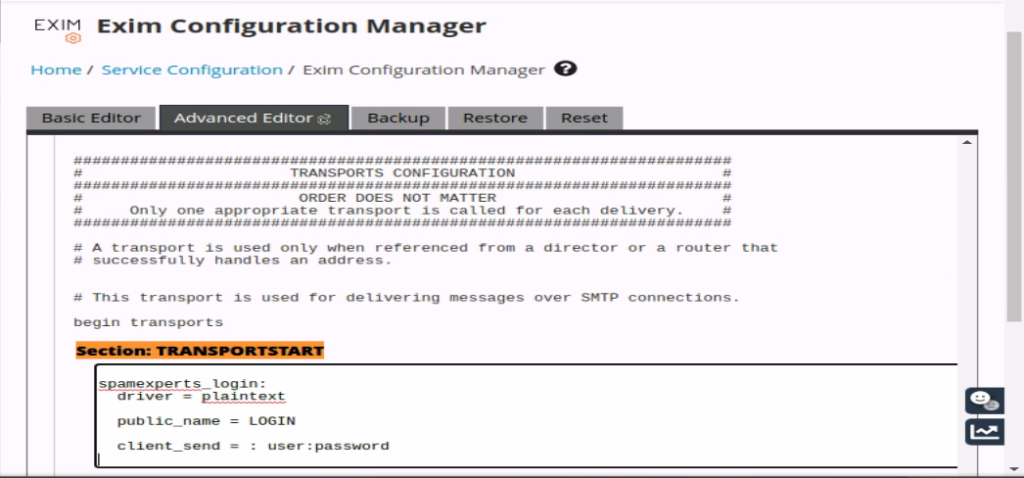
3). Tìm đến “Section: TRANSPORTSTART”thêm vào nội dung như sau:
spamexperts_login:
  driver = plaintext

  public_name = LOGIN

  client_send = : user:password
Trong đó: “user:password” mọi người thay thế bằng tài khoản đã tạo trên Smtp2go

Cấu hình Mail Relay trên Cyberpanel, Virtualmin, Postfix,..
Về cơ bản, Cyberpanel và Virtualmin sử dụng Postfix để gửi mail nên cấu hình Mail Relay trên những Scripts sử dụng Postfix đều giống nhau, các bạn thực hiện như sau:
Thực hiện ssh vào Server và cấu hình main.cf từ /etc/postfix/main.cf
nano /etc/postfix/main.cf
Sau đó thêm vào các dòng sau ở cuối file và thay đổi bằng user/password bằng tài khoản Mail Relay đã tạo từ Smtp2go vào
relayhost = mail.smtp2go.com:2525
smtp_sasl_auth_enable = yes
smtp_sasl_password_maps = static:username:password
smtp_sasl_security_options = noanonymous

Sau khi lưu lại file, mọi người nhớ restart Postfix để áp dụng cấu hình
service postfix restart
Tổng Kết
Như vậy là đã chia sẻ xong cấu hình Mail Relay trên Cpanel, Postfix, Virtualmin, Cyberpanel,… Mọi người kiểm tra bằng cách gửi mail tới 1 địa chỉ Gmail bất kì để test nhé!
Trong quá trình cấu hình, nếu phát sinh lỗi các bạn hãy liên hệ với Rán tại đây, Rán sẽ cố gắng hỗ trợ các bạn trong thời gian sớm nhất có thể. Chúc các bạn thành công!!

